Q: Can I use StencilQuik™ stencils on for the replacement of other SMT devices such as QFPs or PLCCs?
A: Yes, StencilQuik™ stencils can be used for a variety of different SMT devices. When selected and used properly, StencilQuik™ stencils will reduce cycle time for the reflow process and reduce the occurrence of solder shorts. The user should be aware that the alignment process of the StencilQuik™ will be much more difficult as the lead pitch decreases.
Q: Can StencilQuik™ stencils be used to replace flip-chip devices?
A: The use of StencilQuik™ stencils for flip-chip devices is not recommended. In most cases, the device package will rest on the StencilQuik™ stencil and this may result in undesired mechanical stresses in the solder joints. The application of under fill may be restricted by the presence of the StencilQuik™ stencil.
Q: Can I order customized StencilQuik™ stencils based on my particular design requirements?
A: Yes, StencilQuik™ stencils can have the dimensions customized for any application. Currently, there are three thicknesses available, 0.008" (0.203mm), 0.006" (0.152mm) and 0.004" (0.102mm). Once the StencilQuik™ thickness has been selected, outside dimensions or aperture patterns can be applied.
Q: If the solder mask is damaged or missing in the area of the board where the StencilQuik™ stencil will be applied, do I have to repair the mask underneath the part?
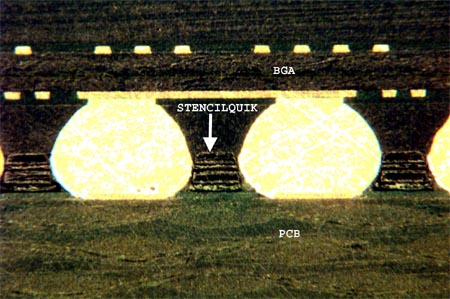
A: No, after removal of a BGA the solder mask may be damaged when wicking braid is used to remove residual solder. If this is the case, there is no need to repair the solder mask. The StencilQuik™ stencil will prevent the solder from migrating down the "dog-bones" to the vias. The two 2-dimensional X-Ray images that follow Clearly demonstrate the mask Repair properties of StencilQuik™. In both case the mask was Completely stripped from two Test vehicle boards. The first image Shows the ball patterns of a BGA Reworked using StencilQuik™. Note Uniformity of the solder ball patterns. In the second image a traditional Metal stencil was used to apply the Solder paste pattern to the board. Note the areas in which solder shorts Occurred and where the solder went Down the dog-bone to the via, thereby starving the solder joint.

Q: How will a StencilQuik™ stencil be affected by placement on a warped area of the board?
A: StencilQuik™ stencils will not be affected at all by a warped area of the board. Since the StencilQuik™ stencil is flexible, it will conform to all areas of the board. This will ensure that the paste print will be uniform and consistent every time. Please be aware that even when using a StencilQuik™ stencil, if the board is extremely warped some of the balls of the BGA may not make contact with the paste.
Q: How many times can a StencilQuik™ stencil be used to perform BGA rework?
A: The StencilQuik™ stencils are designed, based on the permenancy of the adhesive, for single use only. If a StencilQuik™ stencil was used correctly, there are only two reasons to repeat the rework process either the wrong part was placed or it was mis-oriented.
Q: Should I change the design of my StencilQuik™ stencil if the board I am using has solder mask defined pads instead of non-solder mask defined pads?
A: No, our standard designs for the StencilQuik™ stencils are designed to be oversized for the intended pads. This will allow them to be used for either configuration of pads without any changes.
Q: Are there any considerations I should be aware of if I am planning to order a customized StencilQuik™ stencil?
A: As a rule, any BGA with a ball pitch of 1.0mm or greater should use the 0.008" (0.203mm) thickness and any BGA with a ball pitch of less than 1.0mm should use the 0.004" (0.102mm) thickness. The diameter of the apertures should generally be 0.002" (0.051mm) larger than the board pad diameter for devices with a ball pitch of 1.0mm or greater. It is desired that after reflow, the solder ball or joint does not contact any part of the StencilQuik™ stencil.
Q: What is the best way to align the StencilQuik™ stencil to the board?
A: The best way to align the StencilQuik™ stencil to the board is to start by aligning a corner aperture with the associated pad, then align the diagonally opposite aperture and pad. If you are not happy with the alignment at this point, simply lift it up off the board and repeat the alignment process. StencilQuik™ stencils use a pressure-sensitive adhesive so don't press down on the stencil until you are sure of the alignment.
Q: Are StencilQuik™ stencils UL approved?
A: No, StencilQuik™ stencils have not been UL approved. Both the polyimide material and the acrylic adhesive have been UL approved. However the two materials in combination have not been UL approved. Contact BEST if your application calls for the use of UL approved components only.
Q: Do I need to mask off the areas surrounding the StencilQuik™ stencil while I am applying the solder paste, and if I do, what is the best material and method for that?
A: There are two things to look at when determining if you need to mask off areas surrounding the StencilQuik™ stencils. One item is the squeegee (See BEST Marketplace section for different sizes). If the squeegee size matches the StencilQuik™ stencil size, it should be fairly easy to apply the solder paste without the need to mask surrounding areas. The other item of concern is manual dexterity of the technician performing the rework process. If the technician has poor manual dexterity, it may be necessary to mask off the surrounding areas. If it does become necessary to mask the surrounding areas, we have found that polyimide tape (See Kapton tape in the BEST Marketplace section) works well for this. That way if some solder paste ends up outside the dimensions of the StencilQuik™ stencil, it can be lifted up out of the rework area along with the tape after the paste application is complete.
Q: Should I use solder paste or paste flux when using StencilQuik™ stencils?
A: We recommend that you use solder paste when using StencilQuik™ stencils. This will more closely reproduce the original processing of the device and provide similar reliability. Using solder paste is just as easy as using paste flux with StencilQuik™ stencils and will improve the first pass yield of the BGA rework process.
Q: I don't like to handle solder paste. How can I get good results with StencilQuik™ stencils and flux?
A: If you must use flux instead of solder paste, ensure that you use a high quality no-clean paste (sticky) flux. A squeegee should be used to apply the paste flux to the StencilQuik™ stencil followed by a visual inspection to ensure that all the holes have paste flux in them. Liquid flux may contain up to 98% alcohol and the high alcohol content may attack the acrylic adhesive.
Q: What effect do StencilQuik™ stencils have on the electrical characteristics of the assembly?
A: Testing has shown that when StencilQuik™ stencils are used with paste flux, there is a dramatic reduction in electrical leakage from pad to pad in BGA patterns. This is because the active ingredients of the flux are sequestered in the individual apertures of the StencilQuik™ stencil. BGA patterns that did not use StencilQuik™ stencils allow the flux residues to bridge across from one BGA pad to another.
Q: Are StencilQuik™ stencils ESD safe?
A: StencilQuik™ stencils are not treated in any way to reduce ESD. Any treatment that would change the electrical characteristics of the StencilQuik™ stencils would have a detrimental effect on the beneficial insulative qualities of the StencilQuik™ stencils. When StencilQuik™ stencils are peeled from the release liner there will be some static charge generation. The amount of static charge generation on the device is directly proportional to the speed of the liner removal amongst otherv ariables. To keep charge generation at a minimum, remove the release liner slowly. Even though the StencilQuik™ stencil may contain a static charge, as an insulator it will not discharge to any ESD sensitive device. Once placed on the printed circuit board surface, it is possible (but highly unlikely) that it can create a charged surface that may precipitate an ESD event. If your assemblies are ESD sensitive, you may want to consider an air ionizer for the work area to neutralize any static charges present. Use a static field meter to measure the charge generated through the peeling action and apply the correct mitigation technique measuring to confirm effectiveness.
Q: What effect will alcohol and other cleaning solvents have on StencilQuik™ stencils?
A: Alcohol and other similar solvents may attack the acrylic adhesive of the StencilQuik™ stencil and cause it to lose its adhesive characteristics. This is generally not a concern after the BGA has been replaced and reflowed because it has already served its purpose and adhesion to the laminate surface is no longer required.
Q: After the StencilQuik™ is adhered to the board, the solder paste printed and reflowed, what does the cross section look like?
A: As you can see on the cross sectional view (below) the StencilQuik™ never touches the solder ball. In addition note that the construction of the StencilQuik™ is a "sandwich" with two layers of polyimide held together with a high temperature laminate material.
Q: How are the apertures of the StencilQuik™ properly sized?
A: The chart below are the design guidelines that ware used when designing the proper aperture openings for StencilQuik™. The point to remember is that the StencilQuik™ diameter specified needs to be larger than the solder ball diameter. Custom sizes for specific applications can always be manufactured.
| Guidelines for aperture selection | |||
| Typical Largest | |||
| Pitch (mm) | Ball Diameter (mm) | Ball Diameter (inches) | Aperture (mm) |
| 1.27 | 0.762 | 0.030 | 0.84 |
| 1.00 | 0.635 | 0.025 | 0.71 |
| 0.80 | 0.508 | 0.020 | 0.58 |
| 0.75 | 0.457 | 0.018 | 0.53 |
| 0.70 | 0.381 | 0.015 | 0.46 |
| 0.65 | 0.305 | 0.012 | 0.38 |
|
Aperture diameter must be larger than ball diameter |
|||
Q: If the solder mask is damaged or missing in the area of the board where the StencilQuik™ stencil will be applied, do I have to repair the mask underneath the part?
A: When utilizing StencilQuik™ to effect solder mask repairs care should be taken to ensure that the StencilQuik™ apertures diameter are not too large and leave areas of the vias exposed. If portions of the vias are exposed it will allow the solder to "wick" down the vias from the pads. It is recommended that the aperture size is only slightly greater than the ball diameter. This will allow the solder to properly flow and wet while preventing exposed vias.
Q: How will the StencilQuik™'s be packaged? How will they be removed from their backing material?
A: Ten (10) Stencilquik's are packaged in a pink anti-static bag. Shown here is an example of the "easy peel" border that is placed around the actual stencil allowing simple removal of the stencil and the protection of the adhesive during shipping and handling.
Q: Is the residue left by the StencilQuik ™ stencil harmful or negative from a reliability standpoint?
A: BEST’s StencilQuik(TM) rework stencils leave no harmful residues in place on the PCB after it has been taken off of the PCB.
The testing was performed by an outside laboratory with the following as background information:
In blind testing Group "B" represented the StencilQuik(TM) samples. These samples were prepared using the StencilQuik(TM) stencil and a no clean SAC 305 solder paste alloy. The complete report can be found here.